ROS 通信机制进阶-API代码分析
初始化
1
2
3
4
5
6
7
8
9
10
11
12
13
14
|
void init(int &argc, char **argv, const std::string& name, uint32_t options = 0);
|
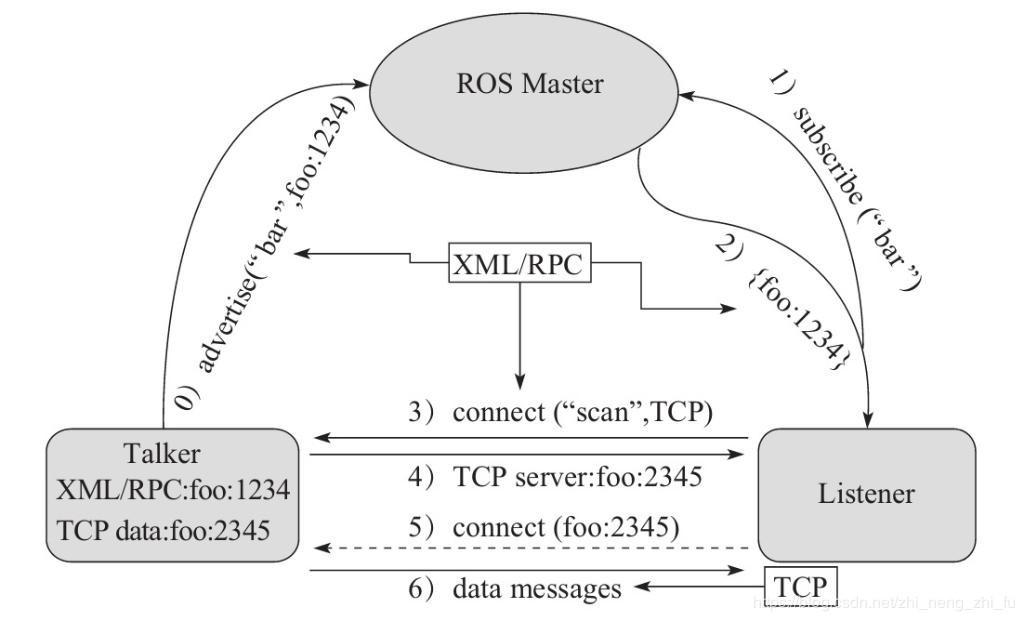
在 roscpp 中,话题和服务的相关对象一般由 NodeHandle 创建。
话题与服务对象
发布对象
1
2
3
4
5
6
7
8
9
10
11
12
13
14
15
16
17
18
19
20
21
|
template <class M>
Publisher advertise(const std::string& topic, uint32_t queue_size, bool latch = false)
|
1
2
3
4
5
|
template <typename M>
void publish(const M& message) const
|
订阅对象
1
2
3
4
5
6
7
8
9
10
11
12
13
14
15
16
17
18
19
20
21
22
23
24
25
26
27
28
29
30
31
32
33
|
template<class M>
Subscriber subscribe(const std::string& topic, uint32_t queue_size, void(*fp)(const boost::shared_ptr<M const>&), const TransportHints& transport_hints = TransportHints())
|
服务对象
1
2
3
4
5
6
7
8
9
10
11
12
13
14
15
16
17
18
19
20
21
22
23
24
25
26
27
28
29
30
31
32
33
34
35
|
template<class MReq, class MRes>
ServiceServer advertiseService(const std::string& service, bool(*srv_func)(MReq&, MRes&))
|
客户端对象
1
2
3
4
5
6
7
8
9
10
|
template<class Service>
ServiceClient serviceClient(const std::string& service_name, bool persistent = false,
const M_string& header_values = M_string())
|
1
2
3
4
5
6
|
template<class Service>
bool call(Service& service)
|
1
2
3
4
5
6
7
8
|
ROSCPP_DECL bool waitForService(const std::string& service_name, ros::Duration timeout = ros::Duration(-1));
|
1
2
3
4
5
6
7
|
bool waitForExistence(ros::Duration timeout = ros::Duration(-1));
|
回旋函数
在ROS程序中,频繁的使用了 ros::spin() 和
ros::spinOnce() 两个回旋函数,可以用于处理回调函数。
1
2
3
4
5
6
7
8
|
ROSCPP_DECL void spinOnce();
|
1
2
3
4
|
ROSCPP_DECL void spin();
|
**相同点:**二者都用于处理回调函数;
不同点: ros::spin()
是进入了循环执行回调函数,而 ros::spinOnce()
只会执行一次回调函数(没有循环),在 ros::spin()
后的语句不会执行到,而 ros::spinOnce()
后的语句可以执行。
时间
ROS中时间相关的API是极其常用,比如:获取当前时刻、持续时间的设置、执行频率、休眠、定时器…都与时间相关。
时刻
获取时刻,或是设置指定时刻:
1
2
3
4
5
6
7
8
9
10
| ros::init(argc,argv,"hello_time");
ros::NodeHandle nh;
ros::Time right_now = ros::Time::now();
ROS_INFO("当前时刻:%.2f",right_now.toSec());
ROS_INFO("当前时刻:%d",right_now.sec);
ros::Time someTime(100,100000000);
ROS_INFO("时刻:%.2f",someTime.toSec());
ros::Time someTime2(100.3);
ROS_INFO("时刻:%.2f",someTime2.toSec());
|
持续时间
设置一个时间区间(间隔):
1
2
3
4
5
| ROS_INFO("当前时刻:%.2f",ros::Time::now().toSec());
ros::Duration du(10);
du.sleep();
ROS_INFO("持续时间:%.2f",du.toSec());
ROS_INFO("当前时刻:%.2f",ros::Time::now().toSec());
|
持续时间与时刻运算
为了方便使用,ROS中提供了时间与时刻的运算:
1
2
3
4
5
6
7
8
9
10
11
12
13
14
15
16
17
18
| ROS_INFO("时间运算");
ros::Time now = ros::Time::now();
ros::Duration du1(10);
ros::Duration du2(20);
ROS_INFO("当前时刻:%.2f",now.toSec());
ros::Time after_now = now + du1;
ros::Time before_now = now - du1;
ROS_INFO("当前时刻之后:%.2f",after_now.toSec());
ROS_INFO("当前时刻之前:%.2f",before_now.toSec());
ros::Duration du3 = du1 + du2;
ros::Duration du4 = du1 - du2;
ROS_INFO("du3 = %.2f",du3.toSec());
ROS_INFO("du4 = %.2f",du4.toSec());
|
设置运行频率
1
2
3
4
5
6
| ros::Rate rate(1);
while (true)
{
ROS_INFO("-----------code----------");
rate.sleep();
}
|
定时器
ROS 中内置了专门的定时器,可以实现与 ros::Rate 类似的效果:
1
2
3
4
5
6
7
8
9
10
11
12
13
14
15
16
17
18
19
20
| ros::NodeHandle nh;
ros::Timer timer = nh.createTimer(ros::Duration(0.5),doSomeThing,true);
ros::spin();
|
定时器的回调函数:
1
2
3
4
| void doSomeThing(const ros::TimerEvent &event){
ROS_INFO("-------------");
ROS_INFO("event:%s",std::to_string(event.current_real.toSec()).c_str());
}
|
其他函数
在发布实现时,一般会循环发布消息,循环的判断条件一般由节点状态来控制,C++中可以通过
ros::ok() 来判断节点状态是否正常,而 python 中则通过
rospy.is_shutdown()
来实现判断,导致节点退出的原因主要有如下几种:
- 节点接收到了关闭信息,比如常用的 ctrl + c
快捷键就是关闭节点的信号;
- 同名节点启动,导致现有节点退出;
- 程序中的其他部分调用了节点关闭相关的API(C++中是
ros::shutdown(),python中是rospy.signal_shutdown())
另外,日志相关的函数也是极其常用的,在ROS中日志被划分成如下级别:
- DEBUG(调试):只在调试时使用,此类消息不会输出到控制台;
- INFO(信息):标准消息,一般用于说明系统内正在执行的操作;
- WARN(警告):提醒一些异常情况,但程序仍然可以执行;
- ERROR(错误):提示错误信息,此类错误会影响程序运行;
- FATAL(严重错误):此类错误将阻止节点继续运行。
节点状态判断
节点关闭函数
日志函数
使用示例
1
2
3
4
5
| ROS_DEBUG("hello,DEBUG");
ROS_INFO("hello,INFO");
ROS_WARN("Hello,WARN");
ROS_ERROR("hello,ERROR");
ROS_FATAL("hello,FATAL");
|
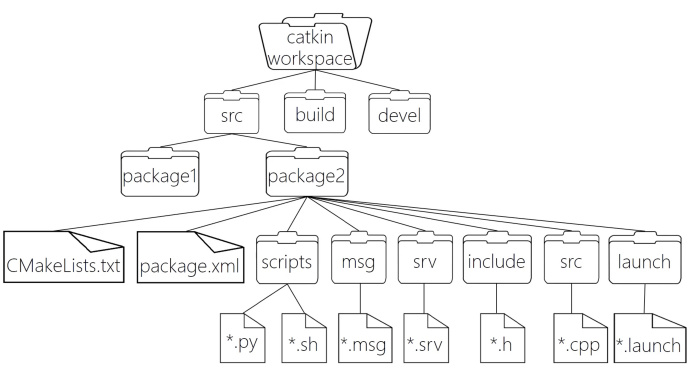
ROS中的头文件与源文件
本节主要介绍ROS的C++实现中,如何使用头文件与源文件的方式封装代码,具体内容如下:
- 设置头文件,可执行文件作为源文件;
- 分别设置头文件,源文件与可执行文件。
在ROS中关于头文件的使用,核心内容在于CMakeLists.txt文件的配置,不同的封装方式,配置上也有差异。
在功能包下的 include/功能包名 目录下新建头文件:
haha.h,示例内容如下:
1
2
3
4
5
6
7
8
9
10
11
12
13
14
15
| #ifndef _HAHA_H
#define _HAHA_H
namespace hello_ns {
class My {
public:
void run();
};
}
#endif
|
注意:
在 VScode 中,为了后续包含头文件时不抛出异常,请配置
.vscode 下 c_cpp_properties.json 的
includepath 属性
1
| "/home/用户/工作空间/src/功能包/include/**"
|
在 src
目录下新建文件:haha.cpp,示例内容如下:
1
2
3
4
5
6
7
8
9
10
| #include "test_head_src/haha.h"
#include "ros/ros.h"
namespace hello_ns{
void My::run(){
ROS_INFO("hello,head and src ...");
}
}
|
在 src 目录下新建文件:
use_head.cpp,示例内容如下:
1
2
3
4
5
6
7
8
9
10
| #include "ros/ros.h"
#include "test_head_src/haha.h"
int main(int argc, char *argv[])
{
ros::init(argc,argv,"hahah");
hello_ns::My my;
my.run();
return 0;
}
|
头文件与源文件相关配置:
1
2
3
4
5
6
7
8
9
10
11
12
13
14
15
16
| include_directories(
include
${catkin_INCLUDE_DIRS}
)
add_library(head
include/test_head_src/haha.h
src/haha.cpp
)
add_dependencies(head ${${PROJECT_NAME}_EXPORTED_TARGETS} ${catkin_EXPORTED_TARGETS})
target_link_libraries(head
${catkin_LIBRARIES}
)
|
可执行文件配置:
1
2
3
4
5
6
7
8
9
| add_executable(use_head src/use_head.cpp)
add_dependencies(use_head ${${PROJECT_NAME}_EXPORTED_TARGETS} ${catkin_EXPORTED_TARGETS})
target_link_libraries(use_head
head
${catkin_LIBRARIES}
)
|